Friday, June 28, 2013

The Blank canvas

The blank canvas, it took some work to get here.  Removing wallpaper, all the remnants of the wallpaper glue, spackling and sanding, all the unfun tedious prep work but its all worth it.  Now I have my blank canvas that depending on the colors I choose, will drastically change the mood and function of the room.  It's amazing what a color can do.

Here are the steps to a perfectly painted room!


Remove the Wallpaper
Prime the Wall
Paint the Trim
Edge out everything!
Fill it in!
Voila!!
I love the feeling of painting over a dirty wall with a fresh coat of paint.  When I roll over all the scuff marks of an old unpainted wall, that is the reason why I love what I do. ( Maybe it's a little OCD kicking in, I want everything to be clean and tidy.)  The final product is always worth all the work and steps.  This is the reason I love painting.  

If you have a room that needs painting, or if you are interested in a custom HandPainted Wall Treatment, please contact me at rebeccazerby@gmail.com.  Also check out some of my HandPainted Wall Treatments on the newly redesigned rebeccazerby.com.


be Bold and try something new!

peace & love
Rebecca


Wednesday, June 26, 2013

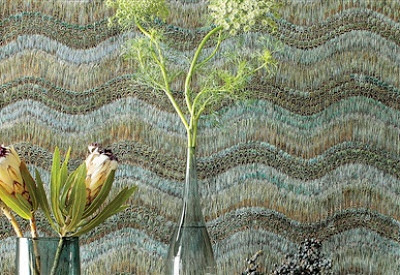
Wallpaper Wednesday: Fiber Walls

Her is something cool I just discovered, covering walls with textiles!  The crazy thing is that it's not a new idea.  It was very common back in the day in France with the royals.   Using textiles instead of wallpaper can be a great solution to your design needs.  Textile wallcoverings are very durable, much more than wallpapers, can reduce sound/noise and can control climate.  It is much more of an investment since the dollar/yard can be much more for textiles than wallpapers.


There are many different ways to install textile wall treatments.  If you have a big job it's best to get it professionally installed.  But if your looking for a quick change with something new, here are some installation techniques.


Stretcher Method.. Stretch it like a big painting and hang as a piece of artwork.  You can change the shape of the frame to fit the space.  Repeat the frames and it will appear as paneling.

Stretch to the Wall Method.. This method is the same idea as the Stretcher method but the frame is attached to the wall.  With this method there is only the top and bottom bar being used.  Staple the fabric to the top beam and attach that beam to the wall.  Attach the second bar to the base.  Stretch the fabric and attach with staples.  This method os more permanent  and sturdy than the stretcher method and can allow you to use thicker fabrics.

The Starch Method..  It is best to choose lightweight fabric.  Wash and completely dry the fabric.  Cut the fabric to fit the wall with about two inches of extra fabric and the top and at the bottom.  Keep in mind matching up the patterns from yard to yard.   With the Starch Method the wall will not be damaged and the fabric can easily be removed.  Use a paint roller, it's less messy and faster than using a brush or dipping the fabric into a container of starch.  Hanging is easy, simply roll the starch onto the wall.  Apply a good thick layer.  Then hang the fabric and smooth with a wallpaper smoothing tool.  Then roll one more starch layer over the fabric and let dry.  A couple of thumbtacks at the top will hold it in place until it dries.  Overlap each strip about 1/2 inch.  When the fabric is dry, take a straight edge and box cutter, and trim away the extra fabric.  Voila! Your done!


Using textiles can add a whole new dimension to a room, adding more texture and dimension that's not normally found in an interior, well not since the 1800's.  


Be bold and try something new!

peace & love
Rebecca

Monday, June 24, 2013

En Excellent Dinner

Saturday night we got some salmon and grilled out.  The meal was so delicious that I just had to share it with you!  On the menu was Barbecue Roasted Salmon, Esquites (Mexican Corn Salad), Jasmine Rice and a Rice Medley (from Trader Joe's), Chocolate Covered Frozen Bananas for desert and a Mojito on the side.

The salmon was perfectly cooked and moist.  This Caribbean version of barbecue brings a fresh take on your typical grilled fare.  The pineapple juice and brown sugar add sweetness while the chili powder and cumin provide the traditional smoky flavor.  The use of orange slices on the grill allows the salon to be perfectly cooked!


Barbecue Roasted Salmon
Marinade:
1/4 c. pinneapple juice
2 T. fresh lemon juice
4 (6oz) salmon filets

Rub:
2 T. brown sugar
4 t. chili powder
2 t. grated lemon rind
3/4 t. ground cumin
1/2 t. salt
1/4 t. ground cinnamon

Preparation:
Combine marinade ingredients in a plastic bag; seal and marinate in refrigerator 1 hour, turning occasionally.

This recipe uses the oven but I used a charcoal grill, I will tell you both ways.
Preheat oven to 400 or start up the grill.

Remove fish from bag; discard marinade.  Combine the rub ingredients.  Rub over fish.
For the oven: Place in a 11x7 inch baking dish coated with cooking spray.  Bake at 400 for 12 minutes or until fish flakes easily when tested with a fork.
For the grill:  Slice an orange into 1/4inch slices.  Place the orange slices on the grill, on the edge, and place the salmon on top of the orange slices.  The orange slices act as a plank and the fish wont stick to the grill.  No need to flip, let sit on the grill covered for 20 to 30 minutes.

here is the original recipe Barbecue Roasted Salmon Recipe

This salad has it all with the sweet caramelized corn, the salty cheese, the sour lime juice and the jalapeno heat and its all held together with garlicky mayonnaise!

Esquites (Mexican Corn Salad)
Ingredients:
2 T. butter
3 c. corn (about 4 ears), cut from the cob
1/2 jalapeño, seeded and finely diced (this can be adjusted on how hot you like it)
3 T. mayonnaise
1 clove garlic, grated
2 green onions, sliced
1 handful cilantro, chopped
1 lime, juiced
2 T. cotija (or feta), crumbled
chili powder to taste
One avocado

Directions:
1. Melt butter in a heavy skillet over medium-high heat.
2. Add the corn, toss and let it sit cooking until charred, mix it up and let it char again, about 6-10 minutes.
3. Add the jalapeño, sauté for a minute and remove from heat.
4. Mix everything and serve warm or at room temperature. 

here is the original recipe Esquites recipe 


This recipe is so simple and delicious.  I've always been hesitant on the chocolate dipped fruits but this way more simple than I expected.  The coconut oil gives the chocolate a nice texture that makes it very dippable.  And it hardly made any mess!

Frozen Dipped Banana Pops
Basic Ingredients:
4 bananas
8 ice cream pop sticks
few tablespoons of chopped nuts

Chocolate Coating:
3/4 c. of sweetened chocolate chips (or unsweetened chocolate chips plus 1 T. of sweetener)
1/4 c. of coconut out (or cacao butter)

Vanilla Coating:
1/4 c. raw cashews 
1/4 c. water
1 T. honey (or other sweetener)
1 t. vanilla extract (or seeds from one vanilla bean)
1/4 c. of coconut oil (or cacao butter)

Vanilla Coating Method:  Combine all the ingredients, except the coconut oil, into a high-speed blender and blend until creamy ant there is no trace of nuts (it can take a few minutes).  Now add the resulting cashew cream to a bowl and place it over hot, simmering water.  Add the coconut oil, and stir until completely melted.  Cool for a bit and dip the bananas in it before freezing them again for at least 5 minutes.  Store in freezer, covered.

Method:
1. Peel the bananas and slice them in half.
2. Slide a popsicle stick in each half, about halfway through, and then freeze them for a few hours (covered).
3. Make the chocolate coating by melting all the ingredients for that coating in a bowl over hot water (a bain-marie).
4. Let the coating cool for a bit and then dip each banana in the coating, swirling it around to coat evenly.
5. Optionally, dip the coated banana in chopped nuts then place it on parchment paper (or other non-stick surface) in the freezer for at least 5 minutes (and store in the freezer, covered).
6. Enjoy!

here is the original recipe Frozen Dipped Banana Pops Recipe


Finally from the garden, I discovered a mint patch growing rampant, so I figured it was the perfect time to make some Mint Mojitos.  We also made Mint Juleps but I'm not a big bourbon fan.


Mint Mojitos
Muddle:
2 T. sugar
couple sprigs of mint
1/4 lime 

In a glass add
Muddle mixture to glass with few cubes of ice.
1.5 oz (shot and a half) of white rum
Half shot to shot of club soda
Fill the rest with ice.
Add a straw and enjoy!

I hope you enjoy these recipes, they are perfect for a summer cookout!  For those warm summer's night/day grab a coozie from the ZerbyShop.  It's the perfect summertime accessory that keeps your hand warm and your beverage cold!  Check them out at http://www.etsy.com/shop/ZerbyShop.  As always if you have any comments please contact me at rebeccazerby@gmail.com or leave a comment below!

peace & love
Rebecca

Friday, June 21, 2013

ZerbyShop is Open for Business

I am happy to announce that the ZerbyShop is finally open on Etsy.  I have been waiting for this day for a long time and I can't believe it's finally here!  It took a lot of creative thinking, product development and product testing and as a result I have some great products.  Visit the shop and take a look around!


The first items to be released are the handcrafted coozies!  Some are screenprinted with an awesome wave print, others are constructed with the custom designed BlackPalm print, and lastly there is the embroidered chevron print.  The coozies come in three sizes, can size, standard bottle size and small bottle size (coronitas!).  There are many more products in the works so stay tuned (hint: there may be some photography, the source of my inspirations, coming soon!)

So please stop by the ZerbyShop www.etsy.com/shop/ZerbyShop and visit my website www.rebeccazerby.com.  New things are happening every day!!  As always feel free to contact me at rebeccazerby@gmail.com or leave a comment!  

peace & love
Rebecca


Thursday, June 20, 2013

Beach Tanks

Every year for our beach trip I make tanks.  It's fun for our group picture at the end of the week to all be wearing the same shirt!  Since it's the beach I can go a little crazy with the design and have some fun with it.  Heres this years design.


I had some fun with it mixing different inks as I pulled it through the screen.  Each screen printed shirt is unique!


Here the Nags Head 2012 tank design.  I incorporated all of our favorite places into one awesome shirt!


This Crabby Tank is great for any summertime event, especially if theres crabs involved!  


These tanks are great for family gatherings or trips.  If your interested in a custom design please contact me at rebeccazerby@gmail.com and we can brainstorm and create the perfect design for any occasion!  See more of my tank and shirt designs on the ZerbyPrint link on my page www.rebeccazerby.com

peace & love
Rebecca

Monday, June 17, 2013

Successful Quotes for a Monday


"Success is liking yourself, liking what you do, and liking how you do it."
~Maya Angelou


"Successful people never worry about what others are doing."
~Kushandwizdom


"Everyone you will ever meet knows something you don't."
~Bill Nye

peace & love
Rebecca

Friday, June 14, 2013

ZerbyShop Coming Soon

For the past couple weeks I have been designing and creating in preparation for the the opening of the  ZerbyShop!  It has been a dream of mine to sell things and the stars are finally starting to line up.  The ZerbyShop will be opening on Etsy next week!  Here's a sneak peek into some of the products I have created, many using fabrics I have designed and printed.


These Coozies come in three sizes- a regular can size, a large to fit bottles, and a small to fit little coronita bottles.  They are available in many patterns and colors!


The pattern on this coozie is created by machine sewing this chevron pattern in different colored lines. I will also be taking this embroidered chevron pattern and applying it to placemats and pillows.


These coasters have the same sewn chevron pattern sewn in.  Sown is the turquoise with bronze but the color combinations are endless.


Finally here are some fun finds I found at the local bead shop, Cloud Nine.  I hope to incorporate them into bags or pillows, the possibilities are endless!

As my time at the beach raps up, I am sad to be leaving this beautiful relaxing place but I am so excited to get back and creat more things!

peace & love
Rebecca

Stormy Beach

Storms on the beach can make for some really beautiful and unique pictures.  This storm came at dusk and not only gave us a break from the sun but also dropped the temps.  Today we now have a beautiful beach day to enjoy.


Tuesday, June 11, 2013

Path to Paradise

                       
Every year my family takes a trip down to the Outer Banks.  It is one of my favorite places ever.  We always go with a group but this year was smaller so we rented this cute little cottage right on the beach.


It is so peaceful here.  I wake up early, not too early, and take my coffee out to the beach and watch the waves.  I could stare at the waves for hours.  It's fun in the sun all day long.  


This is my paradise.  It's simple, I don't need much.  Every once in a while you need a break to clear your head and build up new inspirations.  I can't wait to show you what's in store when I get back!
   

Friday, June 7, 2013

don't wait for inspiration

"The advice I like to give young artists, or really anyone who will listen to me, is not to wait around for inspiration.  Inspiration is for amateurs; the rest of us just show up and get to work.  If you wait around for the clouds to part and a bolt of lightening to strike you in the brain, you are not going to make an awful lot of work.  All the best ideas come out of the process; they come out of the work itself.  Things occur to you."

~Chuck Close

Thursday, June 6, 2013

Inside the PrintShop


Here's a look into my silkscreen printshop.  I started the PrintShop when I came home from college.  I wanted to continue printing and couldn't find a studio.  So I started making the screens and piecing everything together and in not to long a time I had a functioning print shop.  Having a print shop in my basement is very convenient because now I can print whenever I get inspired!


I use the drawing fluid method where I paint on my image with drawing fluid.  Once that is dried I fill the screen with screen filler.  The drawing fluid acts as a resist and the the screen filler doesn't attach in those areas.  When dried, I wash out the drawing fluid with water.  Whats left is the positive of the image that I had drawn.  


There are many different methods of getting the image onto the screen, the most common being photo emulsion.  That is a much more intense process that includes a dark room and then exposing the screen to light.  If and when I get a dark room I definitely want to use this technique.  For now I enjoy the drawing fluid method because it creates a softer painterly effect that isn't common in the screen printing process.


Next I organize my fabrics and inks.  It's good to be prepared and very organized before you start printing.  Once you start you want everything to move smoothly and quickly, you don't want the ink to dry in the screen.


As you can see you can print on almost anything.  I was playing around with mixing colors on the screen to create a marbled look.  When printed on different fabrics and colors the inks look different.  Printmaking is fun because since it is fairly fast, you get results almost immediately and can easily adjust to get the perfect image.


I will now take all my patterns I have printed on fabrics and sew them into new creations that will soon be sold at the ZerbyShop on Etsy.  If you have any questions about the silkscreen printing process or if you would like to see the process in action please don't hesitate to ask.  I would love to show you my print shop and explain the process in more detail.


As always check out my inspirations at my Pinterest page pinterest.com/rebeccazerby93/ and my complete works at the newly redesigned rebeccazerby.com.  Please contact me with any questions at rebeccazerby@gmail.com or leave a comment below!

peace & love
Rebecca


Wednesday, June 5, 2013

Wallpaper Wednesday.. The Abstract

I've been dying to expand into something more abstract, less conventional.  It's something about walls that people are most afraid to try something bold and exciting.  When in reality, in my opinion, walls are the easiest element of the room to change that can make the greatest impact.  So step out of your comfort zone and try something crazy, you can always paint over it.

Below are inspirations I have found on Pinterest (these are not my creations).  Actually most of these are wallpapers but I am confident that I can create the same effect with paint!  I look at walls as a blank canvas to apply layers of paint, creating a unique masterpiece.


I love the abstractness of this turquoise wall, it's a unique spin on an ombre wall.  


This is such a great idea for a dining room.  It has an elegant boldness while keeping traditional elements.  The right color choice is always important to tone down a bold pattern.  Tiffany's blue and gold is always classy.


These line drawings are the closest to what I am currently doing.  It's subtle but striking.  It would be so fun to go onto a while wall with a permanent marker and just start drawing!


This is my all-time favorite wallpaper.  I would just love to be surrounded by giant banana leaves.  This wallpaper is pretty versatile and would work in many rooms.


This wall is something I want to leave you with.  I love nature and this is such a great idea!  It's a new and abstract way of thinking of what we can put on walls, but as crazy as it is there is a classyness to it.  This shade of green is very in right now!


Be sure to check out my new and improved website  rebeccazerby.com and check out all of my other abstract and not so abstract inspirations on my Pinterest page pinterest.com/rebeccazerby93/.  If you have any questions or comments please feel free to contact me at rebeccazerby@gmail.com or leave a comment below!

peace & love
Rebecca

Monday, June 3, 2013

Monday Morning Words of Wisdom


Once a year, go someplace you've never gone before. ~Dalai Lama


To plant a garden it to believe in tomorrow. ~Audrey Hepburn


Let us read, and let us dance; these two amusements will never do any harm to the world.
~Voltaire


 There is only one way to avoid criticism: do nothing, say nothing, and be nothing. ~Aristotle


Sometimes you find yourself in the middle of nowhere,  
and sometimes in the middle of nowhere you find yourself.

happy monday
peace & love
Rebecca